


By now you have a mirror that has a spherical figure of revolution, and a sagitta of about the correct depth to give you the focal length you desire. We can now proceed with the process of smoothing the surface of the mirror to the point it can be polished - this is known as fine grinding.
Using progressively finer grits, the pits and scratches left from the previous grit are removed, resulting in a smooth surface. The progression of grits we use are as follows:
220 -> 500 (25 micron) -> 1000 (12 micron) -> 2500 (9 micron)
Now is the time to be fanatic about cleanliness - each time you progress through a certain size grit, you need to ensure you clean all surfaces thoroughly or you will end up with a scratch on your mirror from a grit larger than you are currently using! This means you either have to revert to that size grit and regrind or at the very least add significantly to the number of wets you need to go through to remove the scratch.
Needless to say, a scratch from rough grit on a polished mirror is a catastrophe that can ruin many hours of work - clean your workspace, move to a new sponge, thoroughly clean out your bucket and your stand, change clothes, take a shower, do what you must to make sure there's no grit hanging about.
The stroke used for fine grinding is the standard one-third diameter centre over centre stroke we used in rough grinding. Start with the tool on top, but see below for notes on how to zero in on the correct focal length. Follow the exact same procedure you did on rough grinding, making sure to be as INconsistent as possible to avoid astigmatism in your final result. Do a few strokes, rotate the tool 30 degrees (or so), walk around the stand 30 degrees (or so), do a different number of strokes, and repeat. When the grit is exhausted (it will last longer than the rough grit, and be quieter as you progress to higher grits) you will hear and feel it. Flush the disk and tool with your sponge, recharge the grit, and repeat. Each grade of grit requires an average of 10 wets before moving on to the next finer grade.
You will know when you are done when you examine the surface of your mirror and there are no pits larger than the size of your grit. It helps to use your Sharpie (or more correctly, another Sharpie to avoid contaminating the surface with large grits) to mark the pits to ensure they disappear. Do a Sharpie Test (as discussed last time) to ensure the mirror remains spherical as well from time to time. Also, remember to re-bevel your edges to avoid chipping the edges of the glass!
There is a chance as you go to finer and finer grits that the tool and mirror will stick to each other - the immediate fix when this happens is to firmly pull back in the opposite direction to the direction you were pushing when they stuck to break the seal. Failing this, stick the whole mess into a pail of warm water and soak. If they don't come apart, stick them into the freezer and let the different coefficients of expansion force them apart. Never try to pry them apart, as this will scratch the mirror. The chance of sticking occurring is less with a tile tool than with a solid glass tool, which is one of the reasons tile tools are recommended.
When you complete a grit, measure your focal length. Unfortunately, the previous method of using feeler gauges won't be effective. Two techniques are useful:
On a sunny day, wet the surface of the mirror and try to obliquely reflect the image of the sun from the mirror to a flat screen - when the image is in focus, the distance from the mirror to the screen is your exact focal length. Note: Be careful, even an unsilvered mirror can cause serious eye damage if you flash the image into someone's eyes.
Alternatively (because it's never sunny when you need it to be), use a flashlight on the wetted surface of the mirror to find the radius of curvature of the mirror, which is twice the focal length. Aim a flashlight at the mirror and hold it close to your eye - move it back and forth. Inside the radius of curvature, the image will move in the same direction as the light. Outside it will move in the opposite direction. When you can't tell which way it's moving, you're at the radius of curvature. Divide by two and you have your current focal length.
Divide the derived focal length by the diameter of your mirror to get the focal ratio. If you discover you have under/overshot the market, simply reverse the positions of the mirror and tool and grind until the focal length is correct. Note that the focal length can change significantly with 120, less with 220 and very little at all with finer grades. Check your focal length often and make adjustments. Alternate tool on top (TOT) and mirror on top (MOT) to ensure that the focal length remains the same - common wisdom says alternate one for one but I find TOT is less efficient at grinding than MOT so I usually do two TOT to one MOT.
When it looks like all the pits have been dealt with, you can determine if you're ready to move on to polishing using inspection (no pits visible using a magnifying glass) as well as the glancing light test. Any smoothed optical surface will reflect an image if seen at a glancing angle. Using an unfrosted light bulb, hold the mirror level and at a glancing angle to the light bulb (see figure)
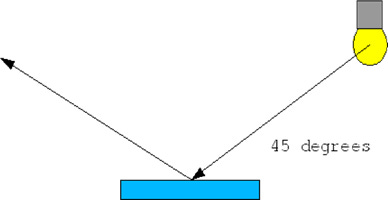
The smoother the surface, the further the incident angle can be from the horizontal. A properly smoothed mirror will reflect a reddened image of the filament of the lamp at an angle of 30 degrees to 45 degrees from the horizontal. If all looks good, we're ready to move on to the polishing process.