


Christian Buil is a wonder. This French spectroscopy wizard has been a driving force behind several excellent amateur spectroscopy projects and products, such as the instruments sold by Shelyak Instruments in France, as well as new 3D printed projects like UVEX and software for spectroscopy like IRIS (image processing) and ISIS (spectral analysis). His website at http://www.astrosurf.com/buil is a mecca for amateur astronomers interested in spectroscopy, the science of analyzing the light of stars (including the Sun, of course) by dispersing the light through a prism or grating to split it into its component colours.
Now, Mr. Buil has released plans for a new spectroheliograph that also (with some minor component additions for guiding) doubles as a spectrograph for nighttime use. The results have been amazing! All images in this article are courtesy of Mr. Buil’s website at http://www.astrosurf.com/solex unless otherwise stated.
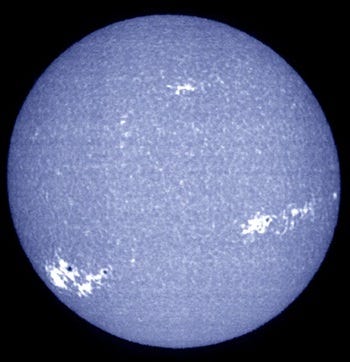
Most readers will be familiar with viewing the Sun through a Hydrogen Alpha (Hα) filtered telescope to see sunspots like a white light filter and surface features and prominences at the edge of the solar disk. A spectroheliograph is an instrument that allows you to “tune” to a specific wavelength, say Hα, but also in Hβ, Ca-IIK, Mg-I, He-I, and pretty much any wavelength within the bounds of the instrument.
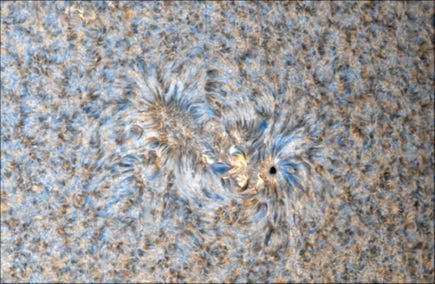
By “tuning” the spectroheliograph to varying wavelengths, it’s possible to traverse the solar layers to get a 3D appreciation of features on the solar disk and how they interact (see below).
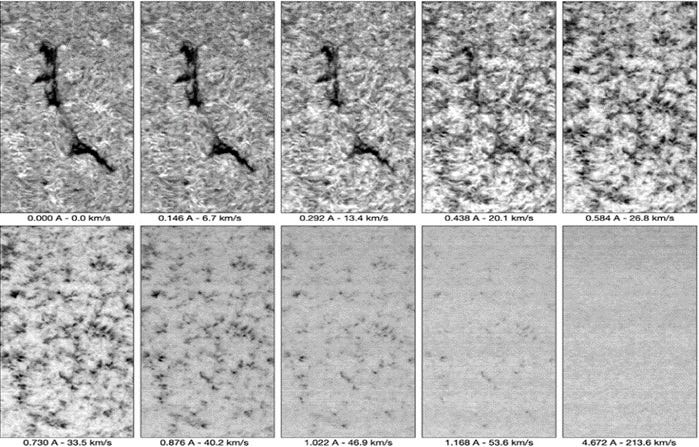
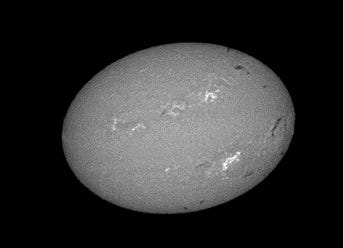
By taking images with specific wavelengths such as Hα, we can also observe the actual motion of the features on the solar disk. For example, if a feature moves away from us, it’s light will be slightly shifted towards the red end of the spectrum. If the feature moves toward us, the Hα line will shift slightly blue. By tuning the instrument slightly to the red, taking an image, shifting slightly blue and taking an image, we can construct a false colour image like the one at left, which shows the motion of the gas on the Sun.
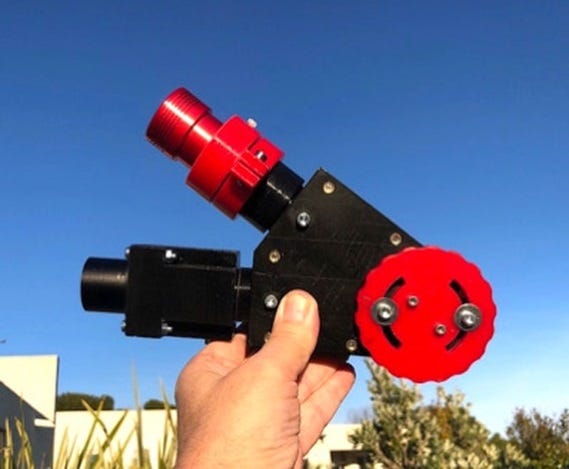
The Sol’Ex is a relatively simple device with some 3D printed parts paired with a commercial camera to provide the images and specialized software to combine the images produced by the camera into a final solar image.
Spectroheliographs work by imaging the Sun through a slit, which means to take an image of the entire solar disk, it needs to be “scanned” in small slices, and the slices then need to be combined through software to produce a final image. Conveniently if the user aligns the slit to be perpendicular to the motion of the Sun in Right Ascension, by turning tracking off, the Sun will pass across the slit of the spectroheliograph and product images.

Optically, spectroheliographs are relatively simple – light is collected through a telescope or lens and is then collimated (aligned) by a pair of simple lenses, bounced off of a grating that causes the light to be diffracted and “smeared out” into a spectrum, then is focused by another set of lenses onto a sensor. The tilt needed to reflect off the grating gives the devices a characteristic folded shape. The optical components of the Sol’Ex are widely available off the shelf or are available as a kit from Shelyak Instruments (https://www.shelyak.com/) for about €400 or about $550CDN. The kit includes a reflecting slit, 2400 gr/mm diffraction grating, and two doublet lenses. As well two lenses are available to expand the Sol’Ex into Star’Ex, which adds the ability to add a guide camera to the Sol’Ex for nighttime use as a spectrograph. Guiding for a slit spectrograph is critical to keep the star centered in the very narrow slit.
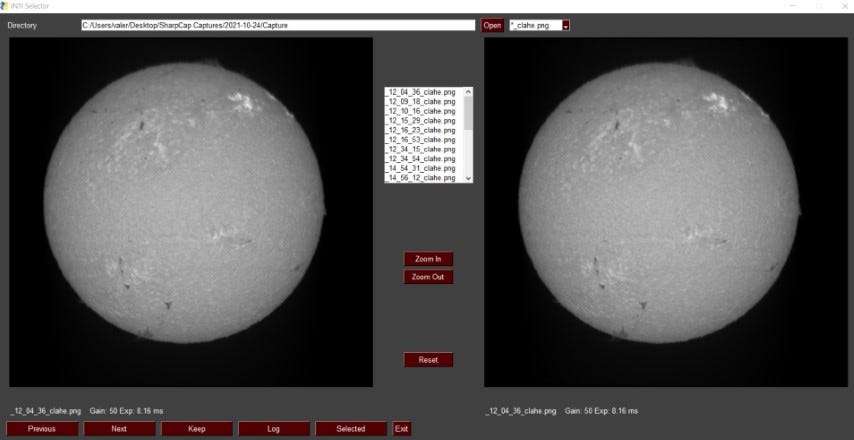
When observing the Sun through the Sol’Ex the result is a SER format file that contains a series of “slices” of the solar disk in the wavelength selected on the Sol’Ex. The software used to combine the slices was developed in Python by Valérie Desnoux (another luminary in the French spectroscopy world, author of the VSPEC spectral analysis software) which is free and easy to install and operate. Below is an image of the software displaying a single “slice” of the solar disk (the curve of the line is an artifact of the optics and is also corrected by the software). The software can be switched to English if your French is rusty! A big plus on the INTI software is it will run on Linux platforms, so it’ll fit in well with my Linux based astronomy infrastructure.
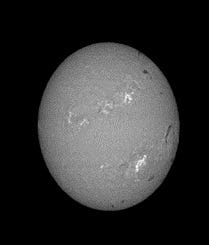
Another function of the INTI software is to remove distortions introduced by the Sun’s image being scanned at too high or low a frequency (producing a rugby ball-shaped image) or the slit not being aligned with the RA axis. These distortions (before correction) can be seen below.

Various cameras and imaging software can be used with the Sol’Ex and INTI, provided they can produce the required SER image. A Sony IMX178-based camera, such as the ZWO ASI178MM or QHY-5III-178, is optimal (the latter mainly due to its small size) as they offer the optimal sensor and small pixel size. However, most cameras, such as my own ASI183MM Pro, will work fine but will have black edges where the image of the slit has not covered the entire sensor, but these are ignored by the software. The Pelletier cooling offered by the ASI183MM Pro is particularly useful when using the Star’Ex configuration. Obviously, as the observations are in a single wavelength (colour), a colour camera is not helpful with Sol’Ex.
The telescope used should be between 200 and 1200mm focal length to get a reasonable disk size (under 200mm the solar disk would be too small to see much detail) where over 1200mm the image size would be very detailed but the exposure time would need to be reduced introducing noise into the images. An instrument of about 420-450mm is needed to capture the entire solar disk in a single “scan.” You can, of course, arrange multiple scans into a single image.
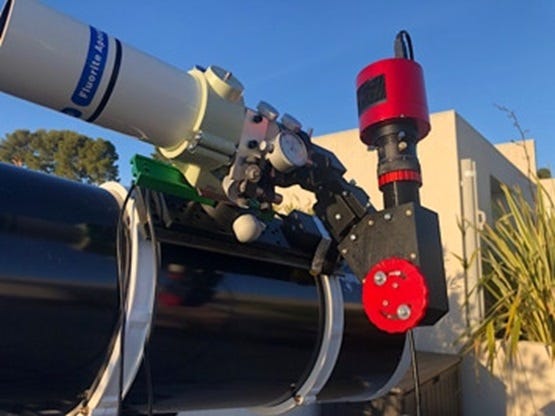
Mirror-based telescopes are not recommended as their aperture is too large to attenuate the Sun’s light sufficiently, causing overheating that can destroy the device. Therefore, a tiny refractor is needed optimally. Aperture directly increases resolution as it increases, so the largest aperture possible is still desirable. However, with larger apertures such as 100mm+, a neutral density filter is required. For example, a filter for a camera lens can be used with some widely available 3D-printed adapters.
With the Sun reaching Solar Maximum this year (we’re not entirely sure when, and won’t know for 6 months since the max is calculated as a 13-month smoothed Sunspot rolling average, 6 months back and 6 forward from a date) it’s a great time to observe the Sun, so I’ve finally bit the bullet and started working on my own Sol’Ex.
Next time, we’ll look at the process of printing the 3D Printed components and assembling the Sol’Ex!
A discussion group focusing on the Sol’Ex is available on Groups.Io at:
https://groups.io/g/Solex-project
All images in this article are from Christian Buil’s excellent Sol’Ex pages retrieved from http://www.astrosurf.com/solex/sol-ex-presentation-en.html.
For those interested in my progress on this build, I've printed all of the components but the optics appear to be trapped in a Fedex warehouse in Memphis so I'm stuck til they arrive!